
Building a file upload service for managing public files in Nestjs with Amazon s3


Modern applications may require files in different formats as part of their product requirements. Storing these files in our database can result in downtime or poor performance because files can take up a lot of space. The best approach is to store these files in an external provider such as Amazon AWS, Google Cloud, or Microsoft Azure.
In this article, we will learn how to build a file upload service in Nestjs using Amazon S3. We will also learn how to configure the files to be either publicly available or accessed by users.
Prerequisites
To follow up with this article, you need to be familiar with the following:
Connecting to S3
S3 also known as Amazon's simple storage service serves as a storage provider for any form of files that are represented as buckets and assessed through the AWS SDK.
To connect to s3, we need to create an AWS account in which we can log in as a root user or IAM (Identity and Access Management) user. The best approach is to log in as an IAM user.
Setting up an IAM user
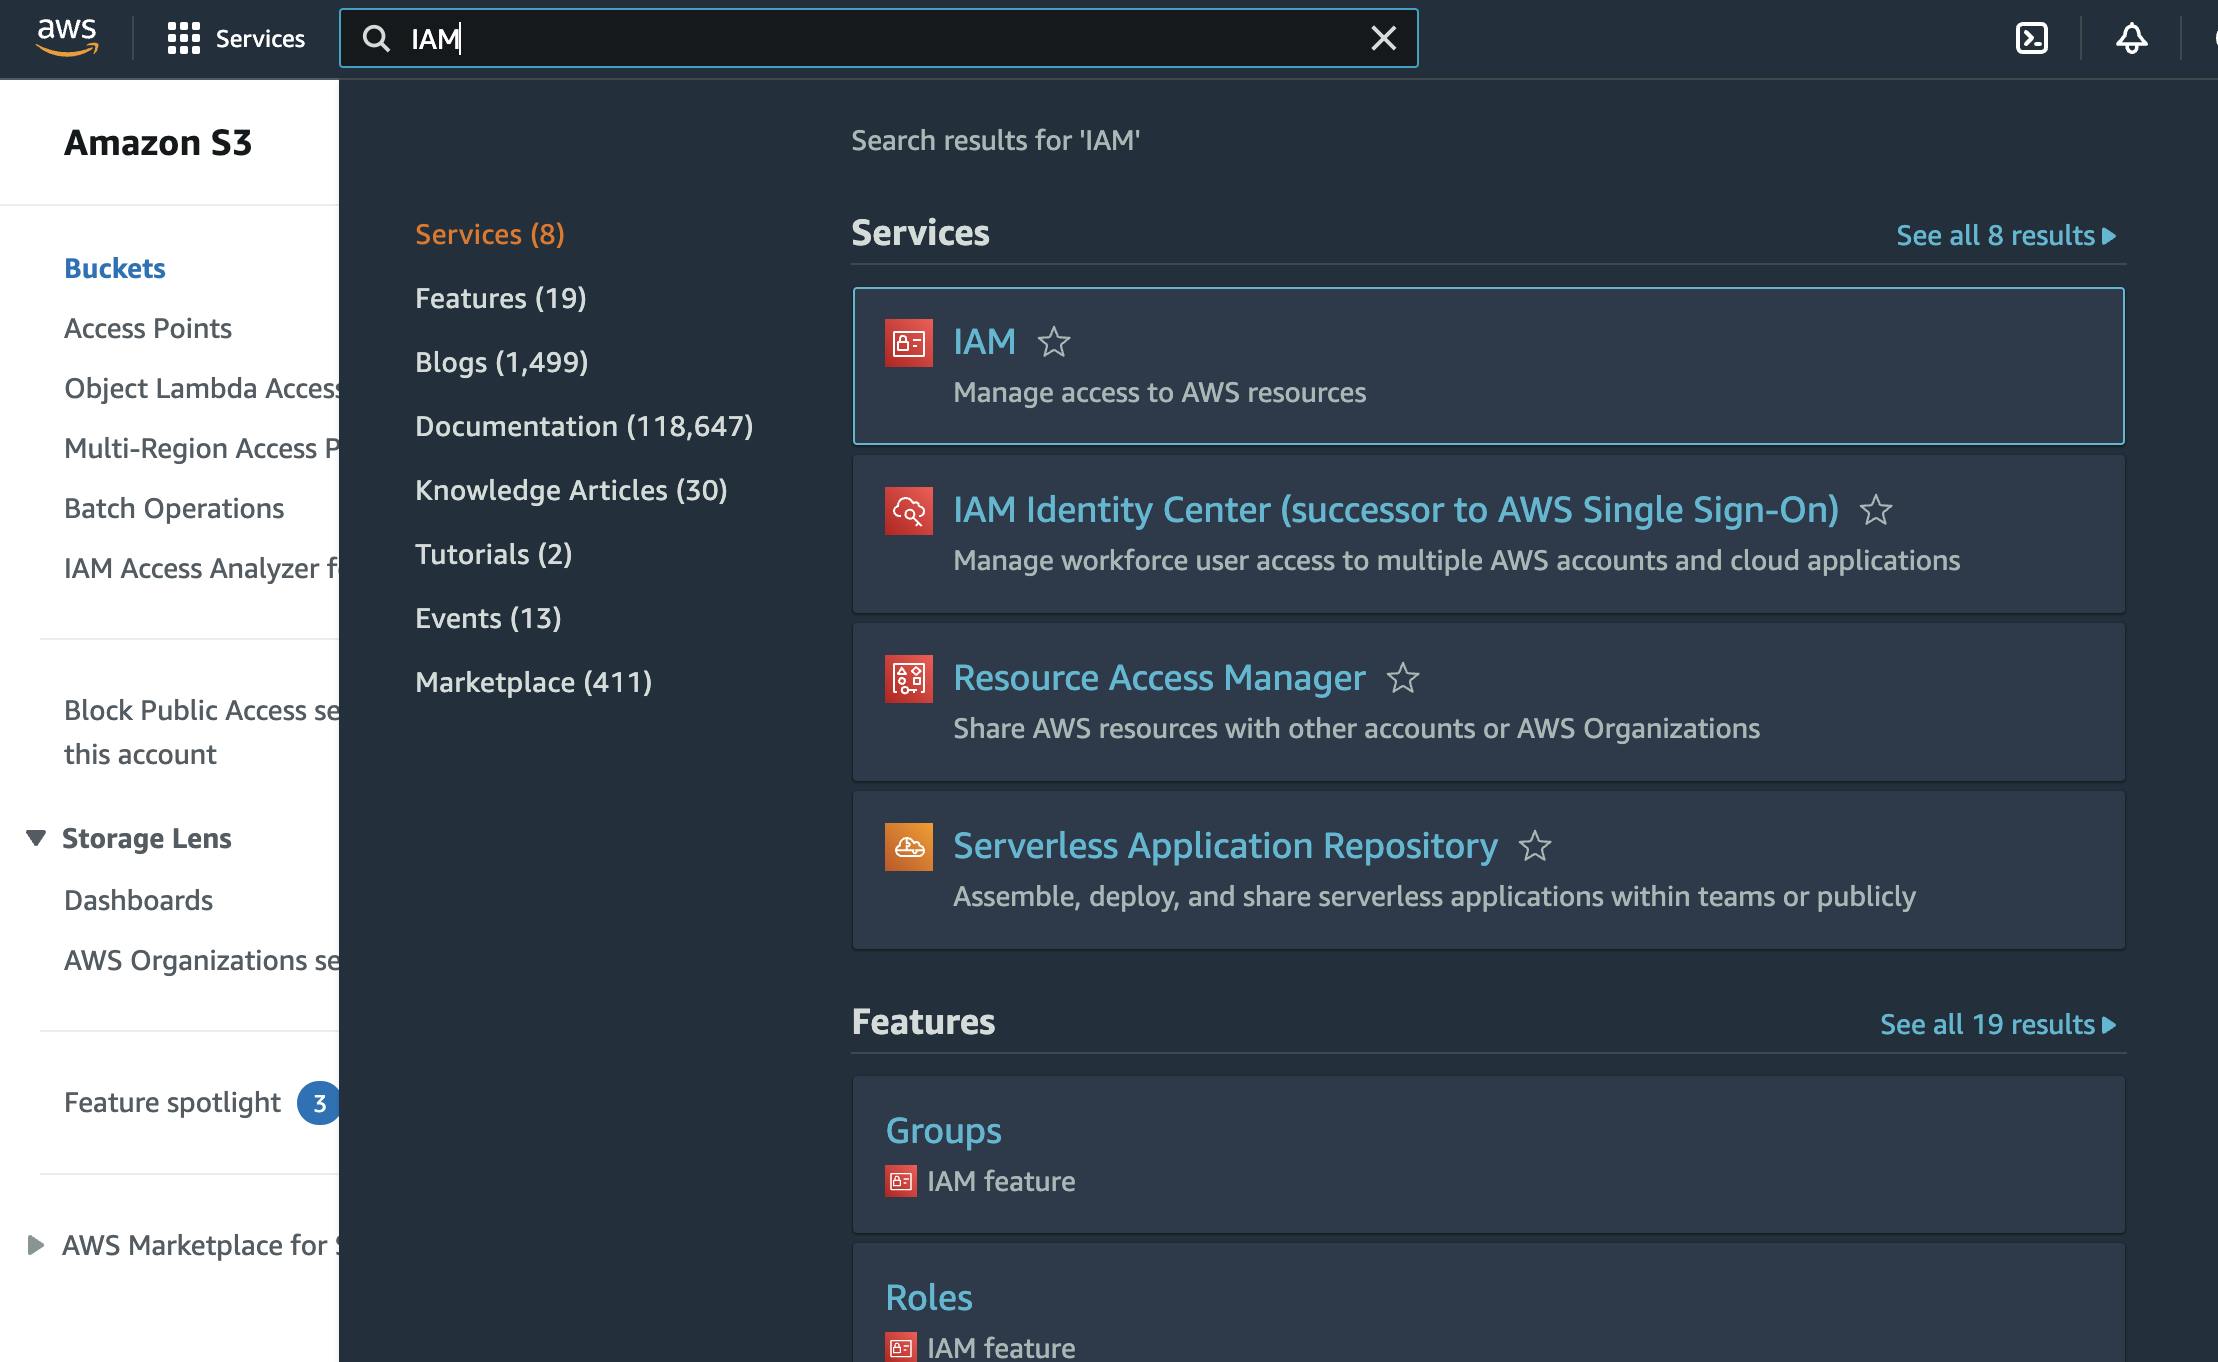
After you log in as a root user, go to your AWS console and search for IAM
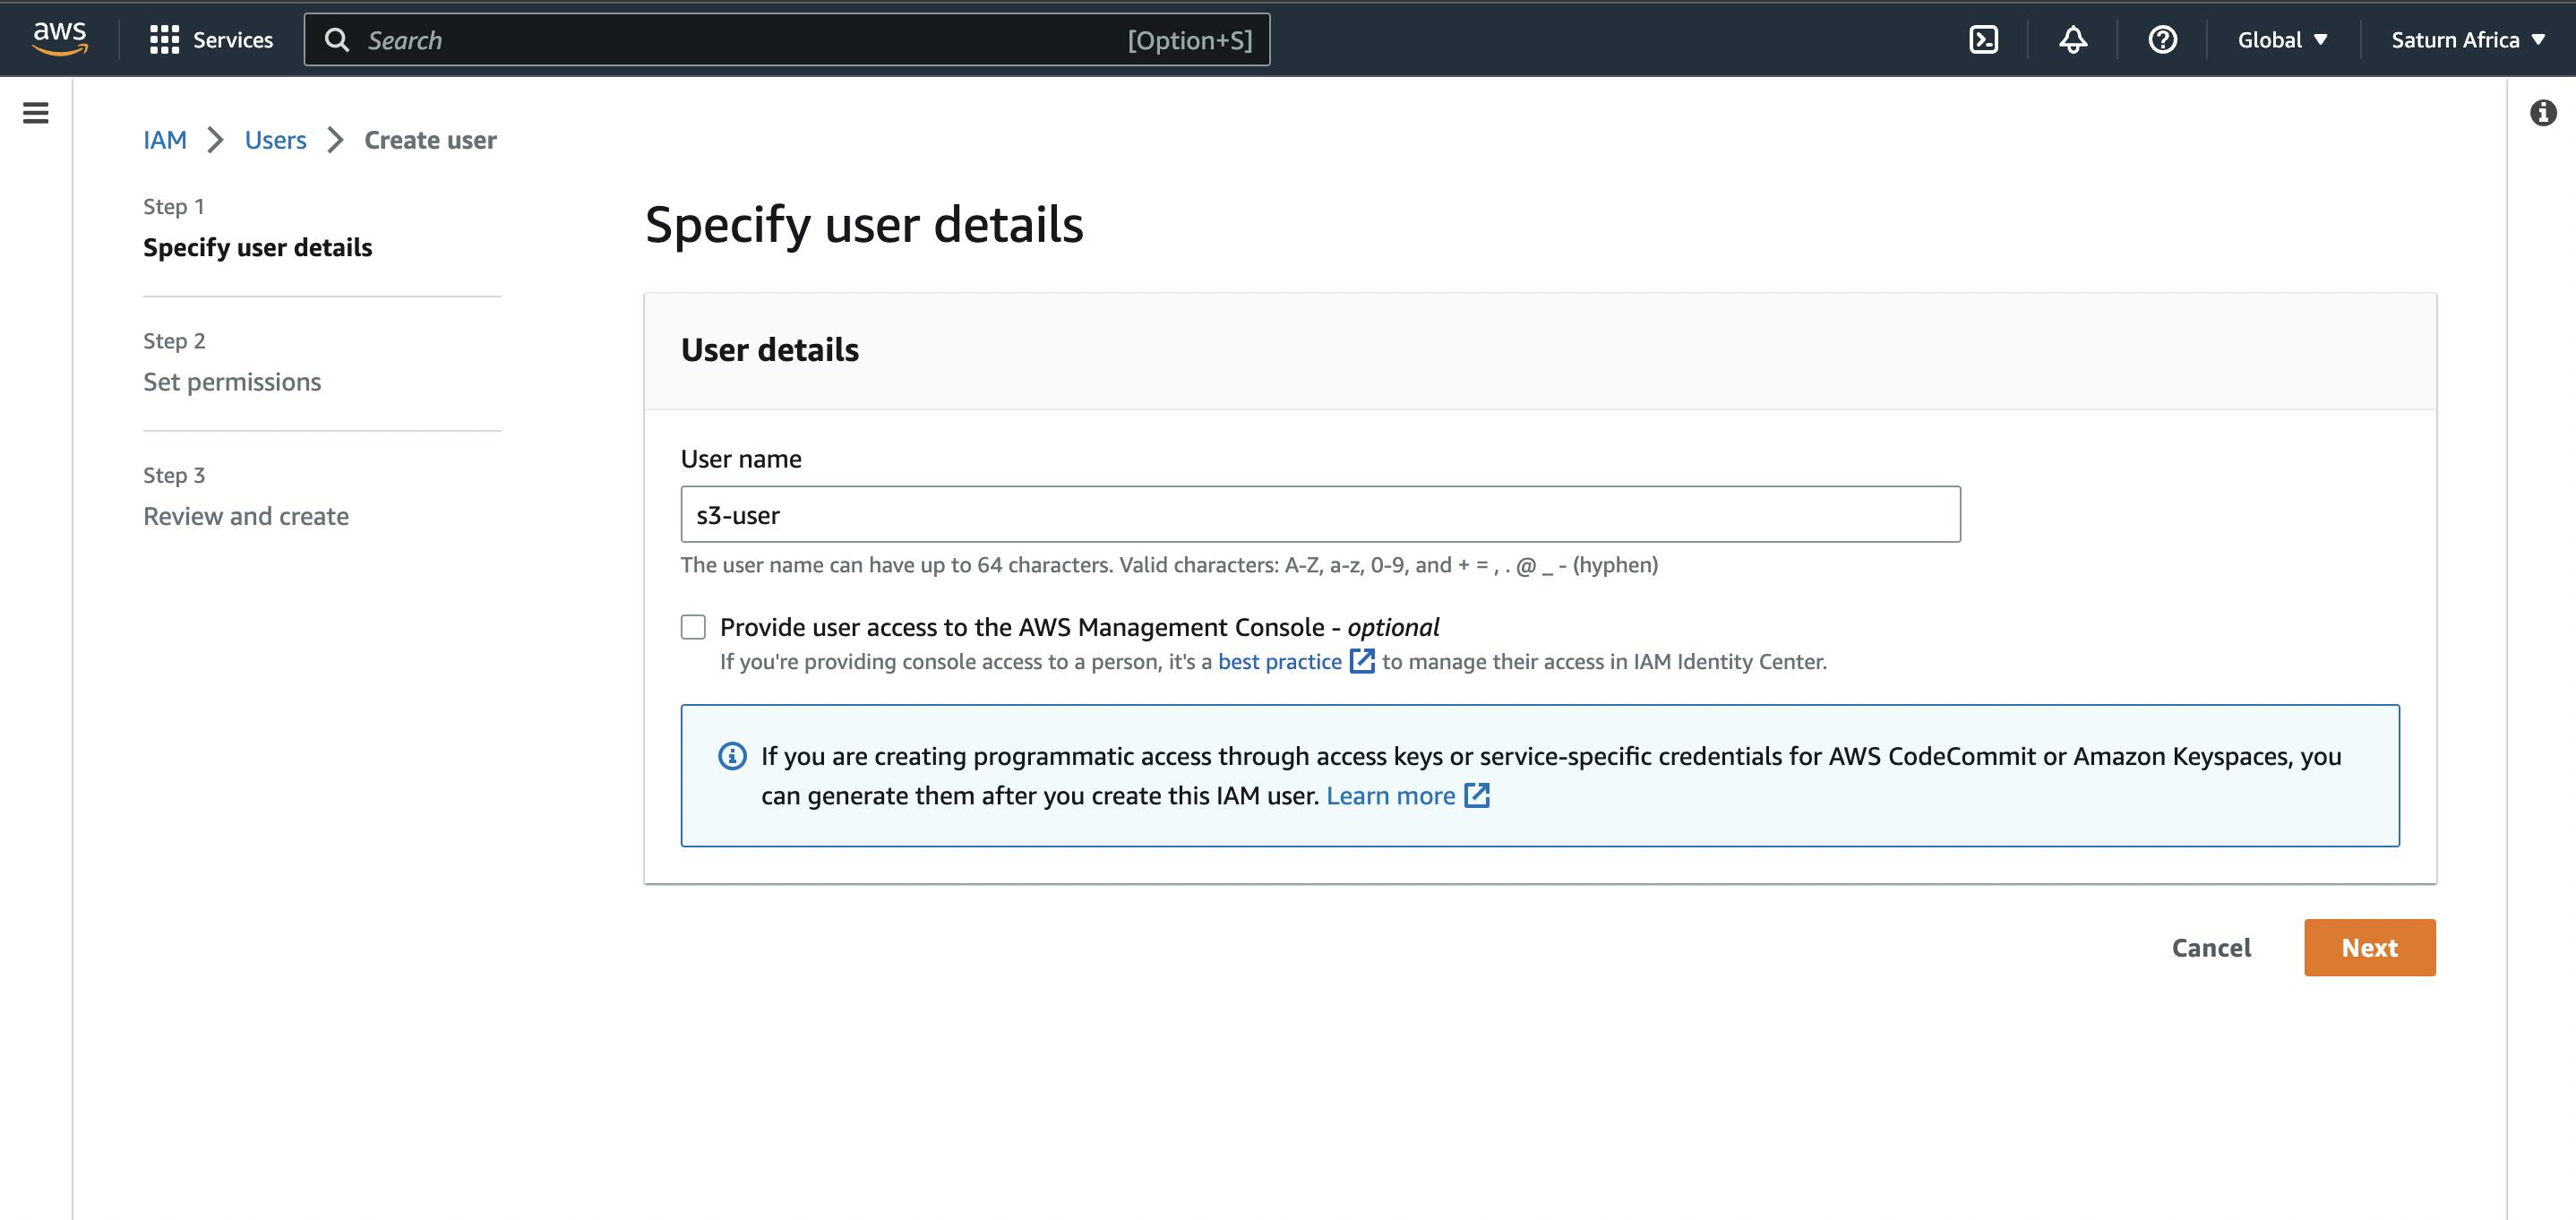
After creating an IAM user, let's give the user full permission access to S3.

Once permission has been given to the user, an Access Key ID and Secret Access Key will be given to you which you can use to access our AWS bucket through our API.
Add these variables to your .env in your Nestjs project:
.env
AWS_REGION=us-east-1
AWS_ACCESS_KEY_ID=************
AWS_SECRET_ACCESS_KEY=*************
Using SDK to connect to AWS
To connect to AWS through our API, we need to install the AWS SDK. On your terminal run the following command:
npm install aws-sdk @types/aws-sdk
Connect to AWS with SDK through our main.ts file
main.ts
import { NestFactory } from '@nestjs/core';
import { Logger, ValidationPipe } from '@nestjs/common';
import { AppModule } from './app.module';
import { setupSwagger } from './utils /swagger';
import helmet from 'helmet';
import * as cookieParser from 'cookie-parser';
**import { config } from 'aws-sdk';**
import { ConfigService } from '@nestjs/config';
import { HttpExceptionFilter } from './filters/http-exception.filter';

async function bootstrap() {
    const app = await NestFactory.create(AppModule, { cors: true });
    app.enableCors({
        origin: '*',
        credentials: true,
    });
    app.use(cookieParser());
    app.useGlobalPipes(
        new ValidationPipe({
            whitelist: true,
        }),
    );
    const logger = new Logger('Main');
    app.enableCors({
        origin: '*',
        credentials: true,
    });

    app.setGlobalPrefix('api/v1');
    app.useGlobalFilters(new HttpExceptionFilter());

    setupSwagger(app);
    app.use(helmet());

    **const configService = app.get(ConfigService);
    config.update({
        accessKeyId: configService.get('AWS_ACCESS_KEY_ID'),
        secretAccessKey: configService.get('AWS_SECRET_ACCESS_KEY'),
        region: configService.get('AWS_REGION'),
    });**

    await app.listen(AppModule.port);

    // Log docs URL
    const baseUrl = AppModule.getBaseUrl(app);
    const url = `http://${baseUrl}:${AppModule.port}`;
    logger.log(`API Documentation available at ${url}/docs`);
}
bootstrap();
Run the application, and if you configured everything well, it should run successfully.
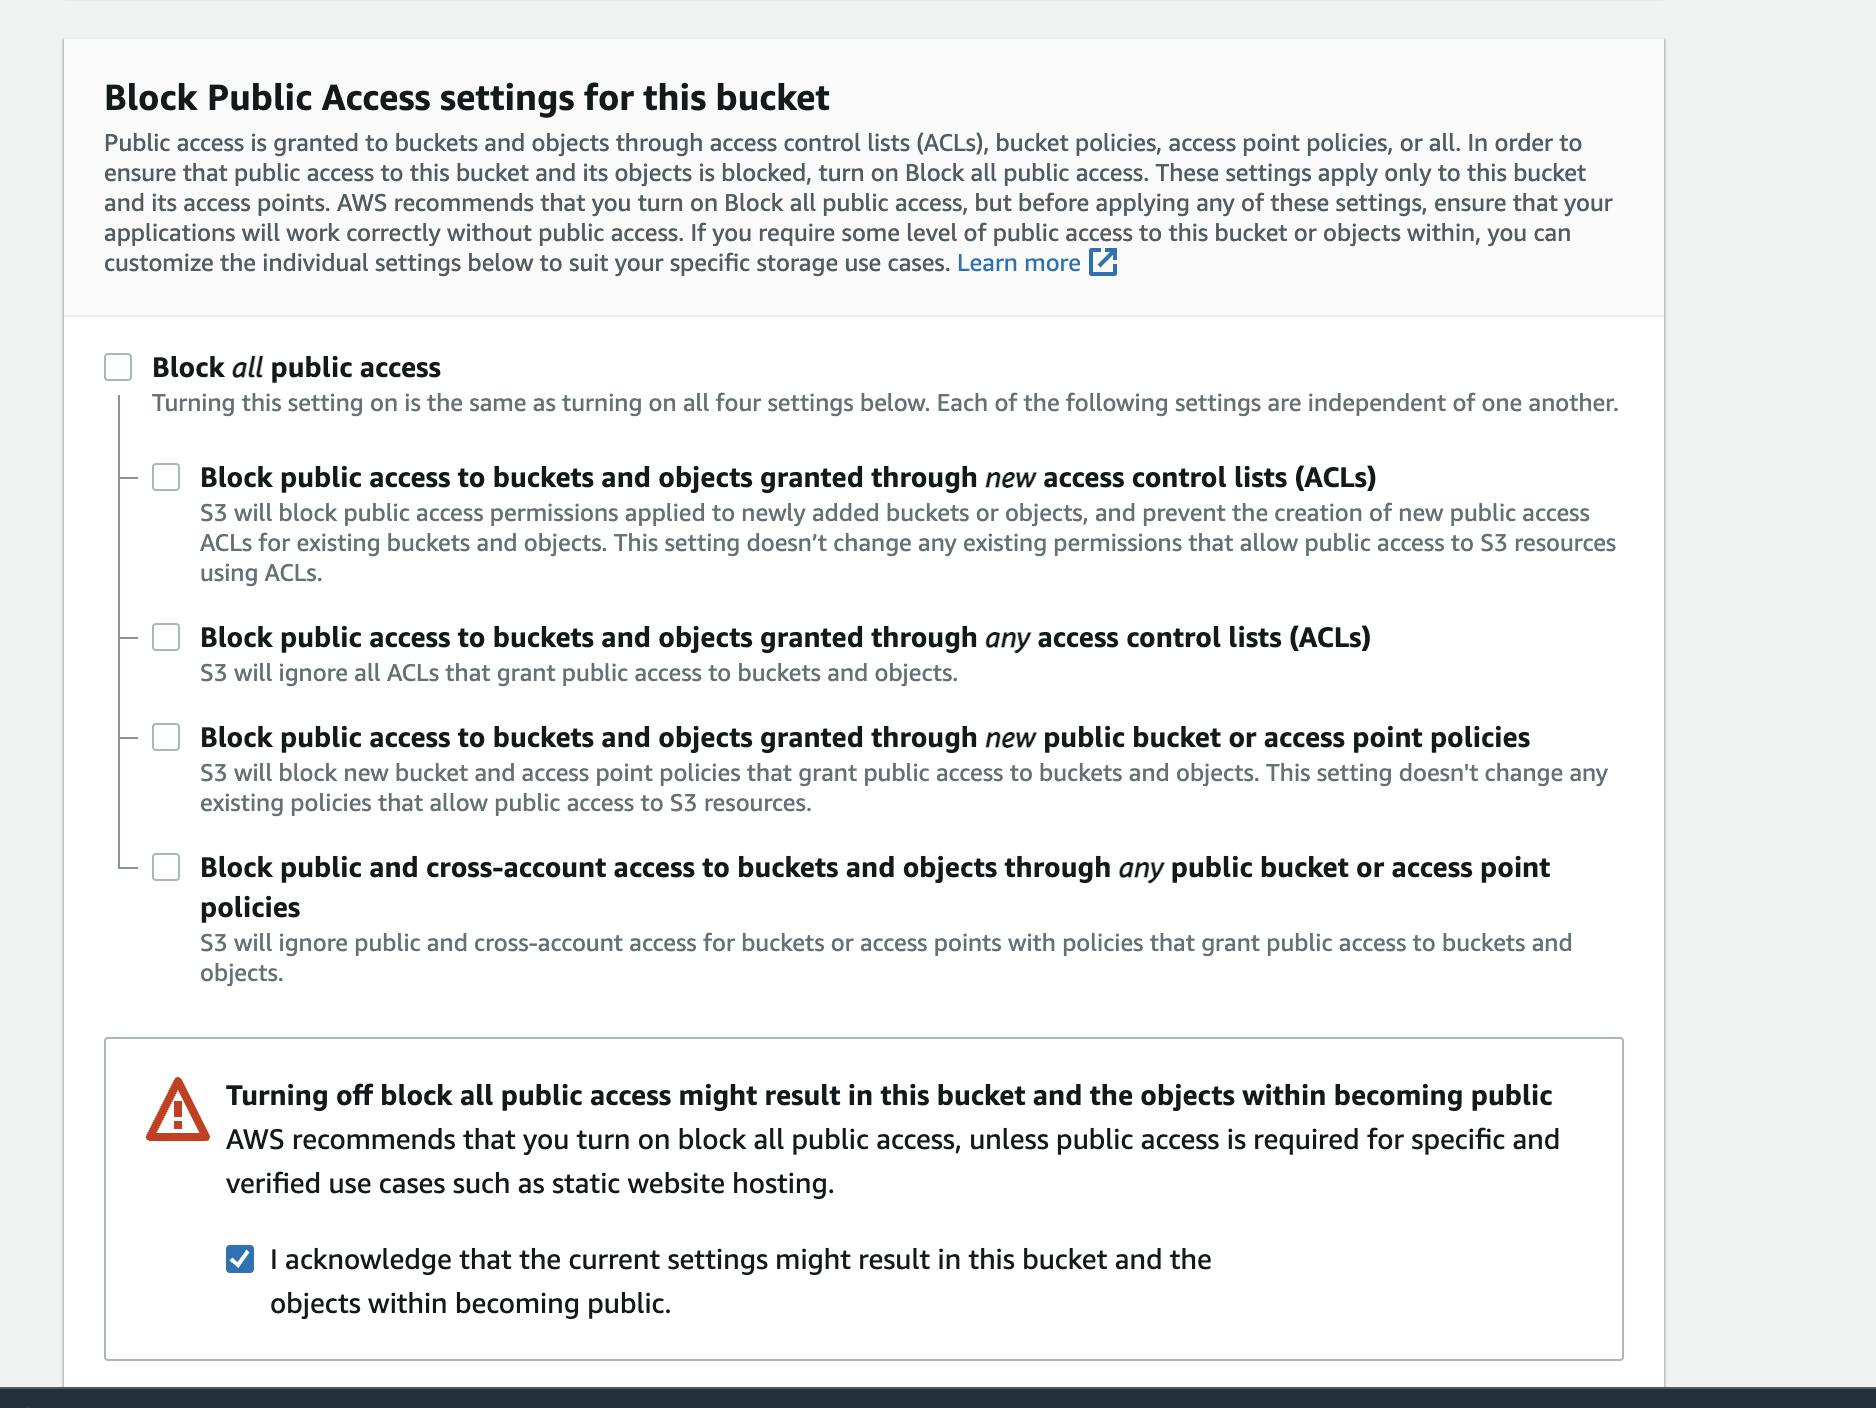
Creating a bucket on AWS S3
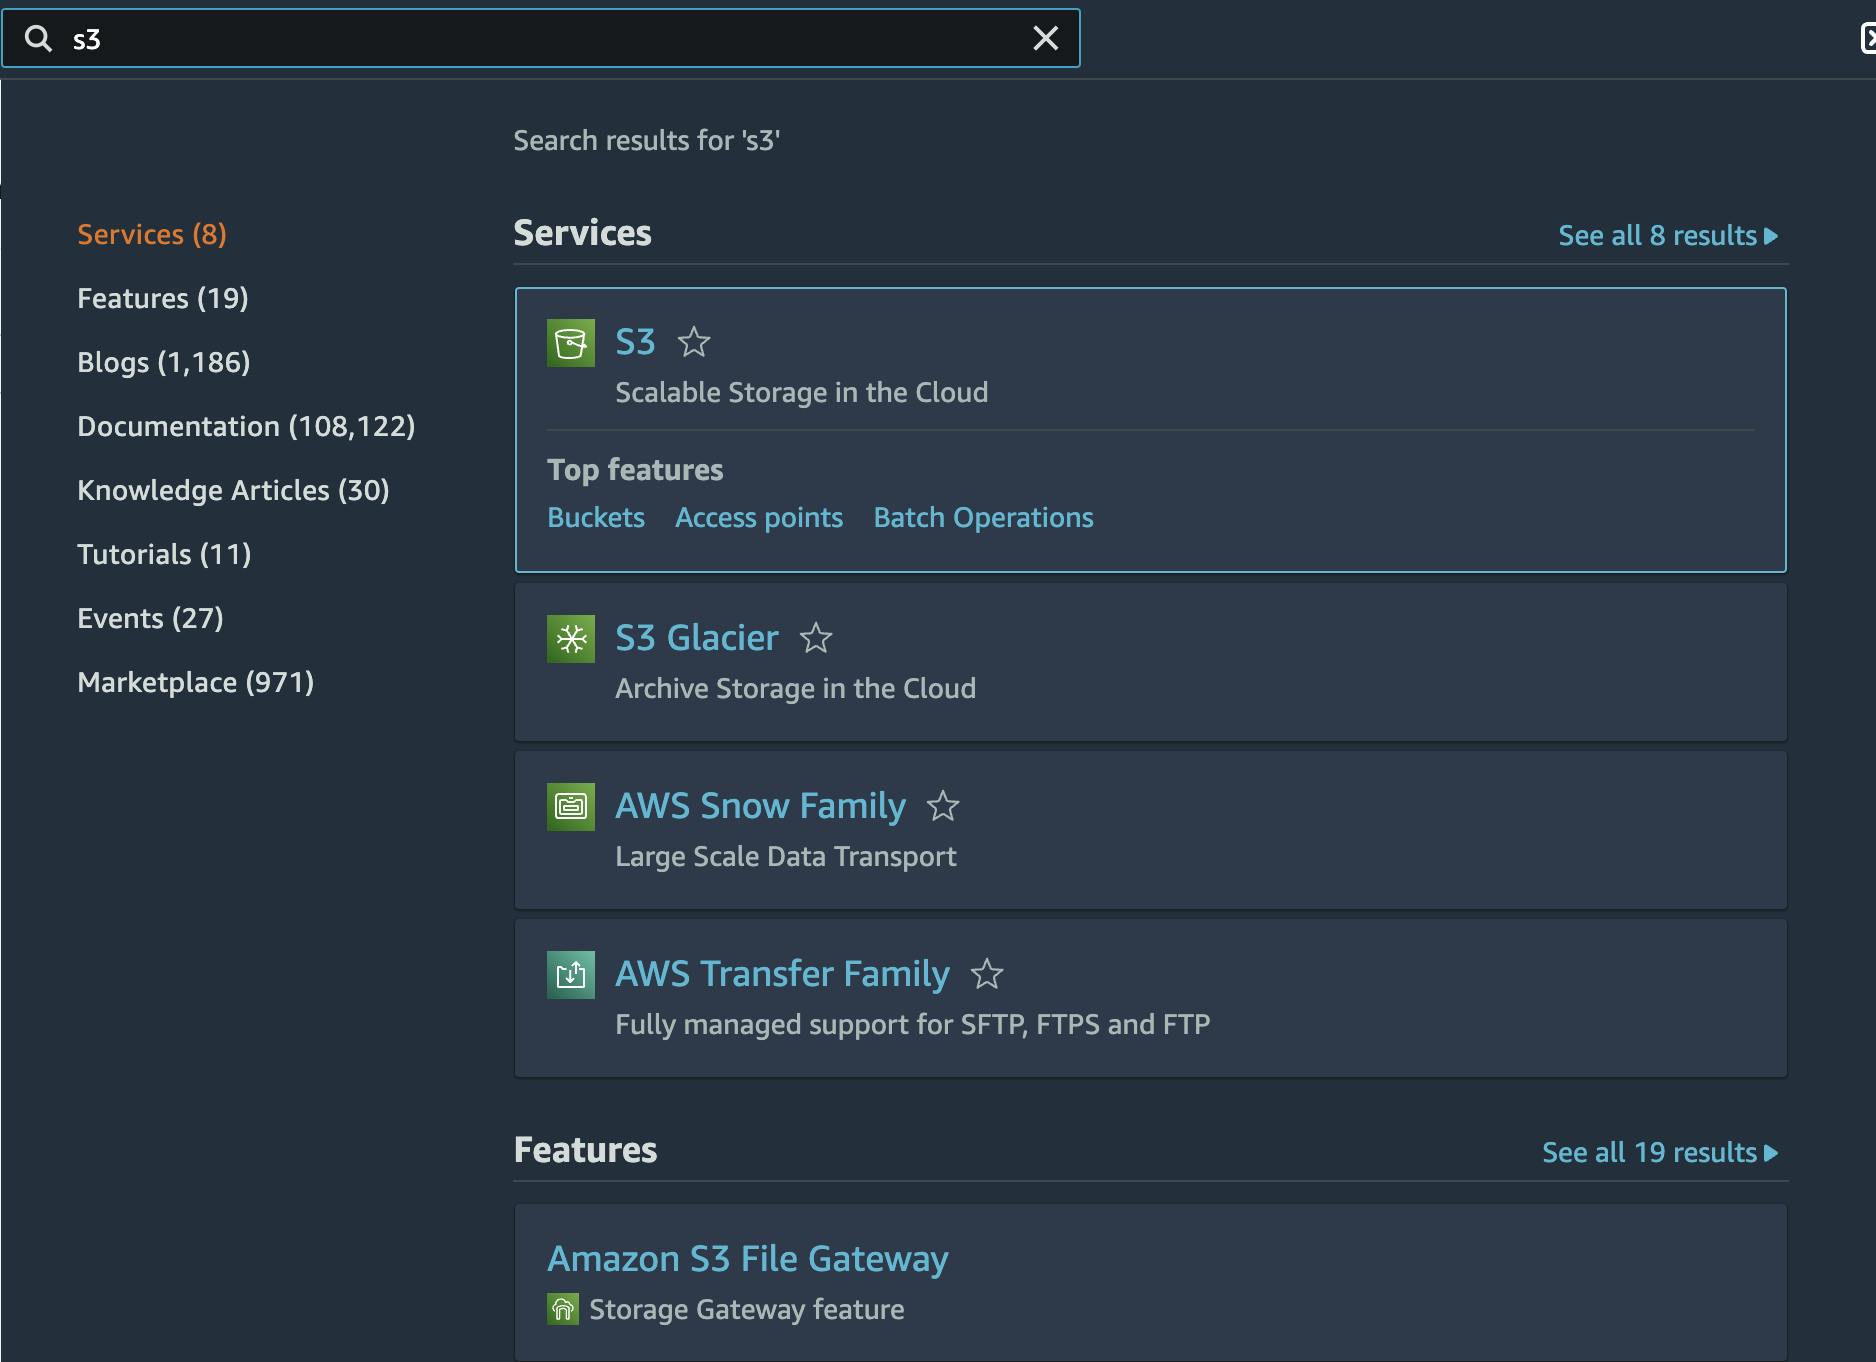
To create a bucket which is how files are arranged in S3, we need to go to the AWS console and search for S3.
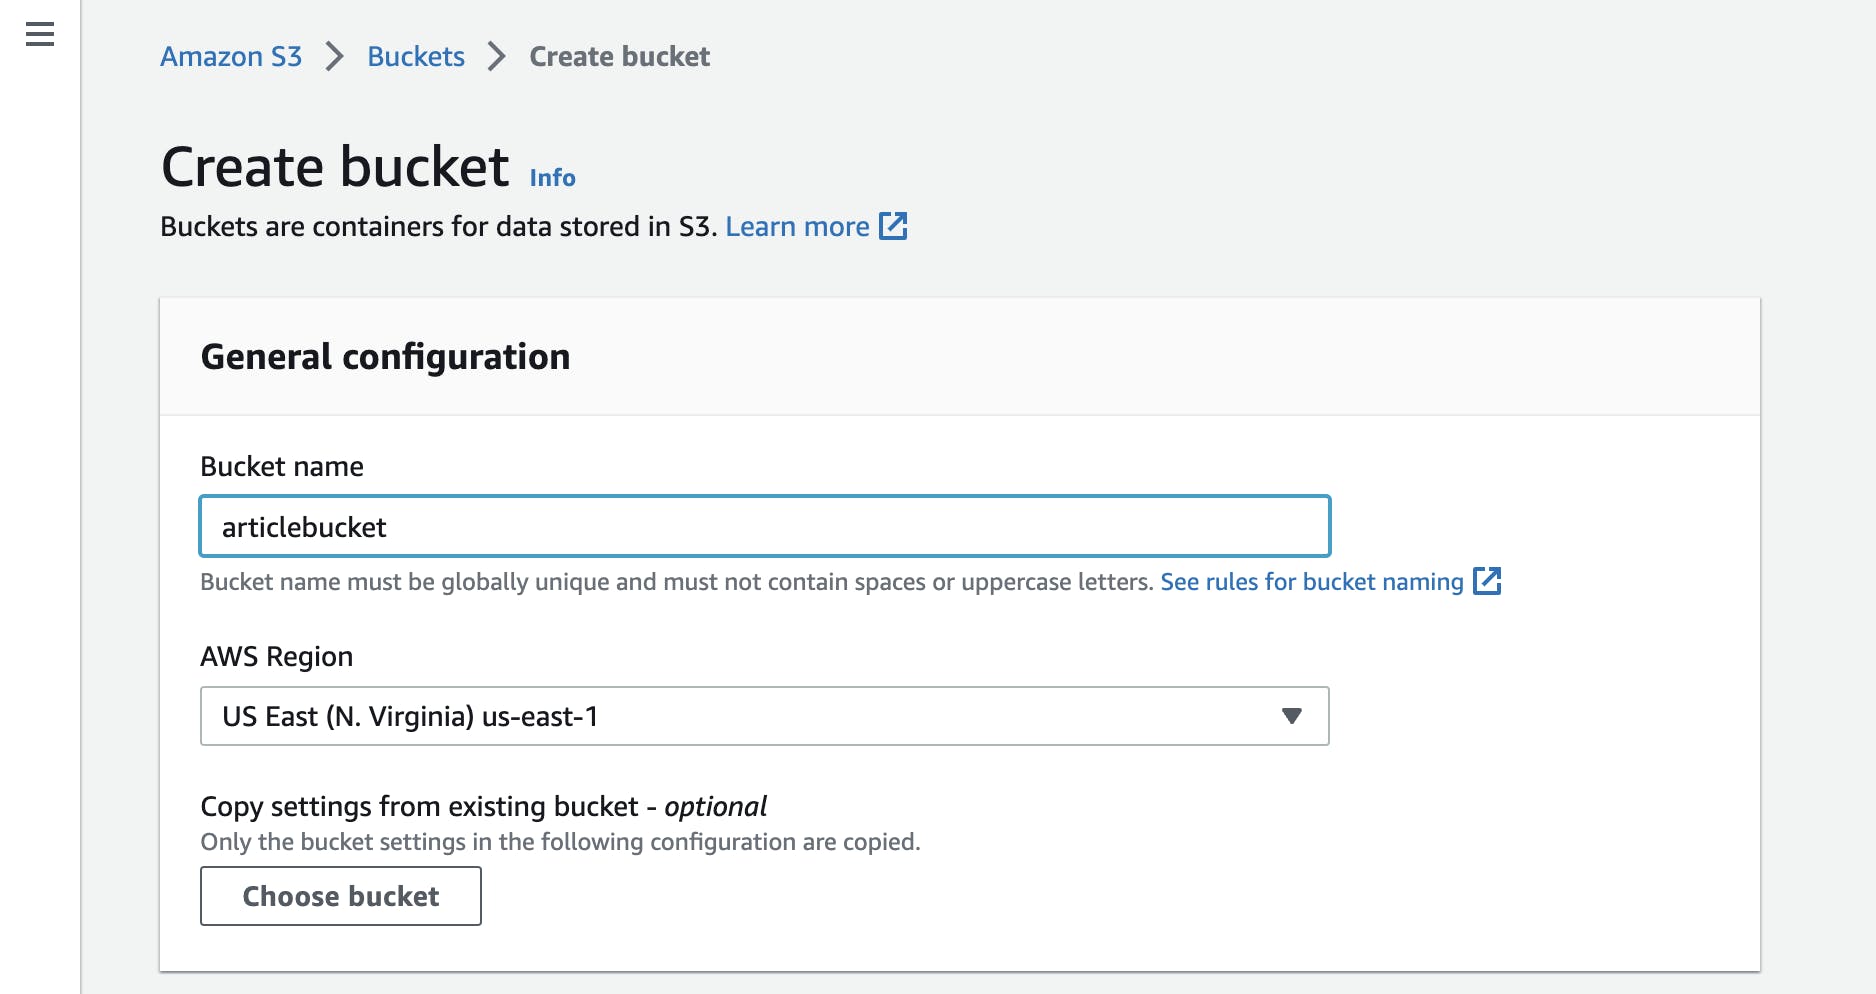
We want our buckets to be available to the public, so we have to allow public access to the files while creating the bucket. An example of files that we can allow public access to is a user’s profile image.
Next, we have to add the bucket name to our .env file:
.env
AWS_PUBLIC_BUCKET_NAME=articlebucket
Your bucket name has to be unique, so provide it with another name.
Setting up an uploading file service
Once our server has successfully connected to AWS, we can proceed to create a file upload service but before that, we have to create a file schema.
On your terminal run the following command:
nest g module uploads
nest g controller uploads
nest g service uploads
touch src/uploads/upload.schema.ts
import { Document, ObjectId } from 'mongoose';
import { Prop, Schema, SchemaFactory } from '@nestjs/mongoose';
import { Transform } from 'class-transformer';

export type UploadDocument = Document & Upload;

@Schema()
export class Upload {
    @Transform(({ value }) => value.toString())
    _id: ObjectId;

    @Prop()
    url: string;

    @Prop()
    key: string;
}

export const UploadSchema = SchemaFactory.createForClass(Upload);
The url property saves the file url in our database which gives us direct access to the file while the key property serves as a unique identifier of each file in a bucket which is useful in some cases, for example, when you want to delete the file.
To make the key unique, we can use the [uuid](https://www.npmjs.com/package/uuid) package to generate unique IDs. On your terminal run:
npm install uuid @types/uuid
To create an upload service, go to uploads.service.ts
import { ConfigService } from '@nestjs/config';
import { Model } from 'mongoose';
import { Upload, UploadDocument } from './upload.schema';
import { HttpException, Injectable, HttpStatus } from '@nestjs/common';
import { InjectModel } from '@nestjs/mongoose';
import { S3 } from 'aws-sdk';
import { v4 as uuid } from 'uuid';

@Injectable()
export class UploadsService {
    constructor(
        @InjectModel(Upload.name) private uploadModel: Model<UploadDocument>,
        private configService: ConfigService,
    ) {}

    async uploadFile(dataBuffer: Buffer, filename: string) {
        const s3 = new S3();
        const uploadResult = await s3
            .upload({
                Bucket: this.configService.get('AWS_PUBLIC_BUCKET_NAME'),
                Body: dataBuffer,
                Key: `${uuid}-${filename}`,
            })
            .promise();

        const newFile = await this.uploadModel.create({
            key: uploadResult.Key,
            url: uploadResult.Location,
        });

        await newFile.save();
        return newFile;
    }
}
The uploadFile method takes in a [buffer](https://www.quora.com/What-is-a-buffer-in-the-computer) which is a memory chunk that serves as a binary representation of a file and the filename.
Setting up a controller for uploading files
Let’s create an endpoint for uploading user profile images. To do that, we have to create a User schema and then reference the photo property to the Upload schema.
import { Prop, Schema, SchemaFactory } from "@nestjs/mongoose";
import mongoose, { Document } from "mongoose";
import { Upload } from "src/uploads/upload.schema";

export type UserDocument = User & Document;

@Schema({
    toJSON: {
        getters: true,
        virtuals: true,
    },
    timestamps: true,
})
export class User {
    @Prop({ required: true, unique: true })
    username: string

    @Prop({ required: true })
    password: string

    @Prop({ required: true, unique: true })
    email: string

    @Prop({ type: mongoose.Schema.Types.ObjectId, ref: 'Upload' })
    photo: Upload;
}

const UserSchema = SchemaFactory.createForClass(User)

UserSchema.index({ email: 1 });

export { UserSchema };
In our user service, we can create a method that can enable a user to upload profile images. We have to make the upload service a dependency of other services by providing in the list of exports in uploads.module.ts
import { Upload, UploadSchema } from './upload.schema';
import { Module } from '@nestjs/common';
import { UploadsController } from './uploads.controller';
import { UploadsService } from './uploads.service';
import { MongooseModule } from '@nestjs/mongoose';

@Module({
    imports: [
        MongooseModule.forFeature([
            { name: Upload.name, schema: UploadSchema },
        ]),
    ],
    controllers: [UploadsController],
    providers: [UploadsService],
    exports: [UploadsService],
})
export class UploadsModule {}
The uploads service can now be used as a dependency for the user service:
import { HttpException, HttpStatus, Injectable } from '@nestjs/common';
import { InjectModel } from '@nestjs/mongoose';
import { User, UserDocument } from './schemas/user.schema';
import { Model } from 'mongoose';

import { UploadsService } from 'src/uploads/uploads.service';

@Injectable()
export class UsersService {
    constructor(@InjectModel(User.name) private userModel: Model<UserDocument>,  private uploadsService: UploadsService) {}

    async addProfilePhoto(
        userId: string,
        imageBuffer: Buffer,
        filename: string,
    ) {
        const photo = await this.uploadsService.uploadFile(
            imageBuffer,
            filename,
        );

        const updatedUser = await this.userModel.findByIdAndUpdate(userId, {
            photo: photo,
        });

        if (!updatedUser) {
            throw new HttpException(
                'The user with this id does not exist',
                HttpStatus.NOT_FOUND,
            );
        }
        return updatedUser;
    }

}
We can now set up an endpoint that would utilize the addProfilePhoto method to upload an image. To do this we have to use the [FileInterceptor](https://docs.nestjs.com/techniques/file-upload) which uses [multer](https://www.npmjs.com/package/multer) under the hood.
import { AccessTokenGuard } from 'src/common/guards/accessToken.guard';
import { UsersService } from './users.service';
import { Body, Controller, Delete, Get, Param, Patch, Post, Put, Req, UseGuards, UploadedFile, UseInterceptors } from '@nestjs/common';
import MongooseClassSerializerInterceptor from 'src/utils /mongooseClassSerializer.interceptor';
import { User } from './schemas/user.schema';
import RequestWithUser from 'src/auth/requestWithUser.interface';
import { FileInterceptor } from '@nestjs/platform-express';
import { Express } from 'express';

@Controller('users')
@ApiTags('Users')
@UseInterceptors(MongooseClassSerializerInterceptor(User))
export class UsersController {
    constructor(private readonly usersService: UsersService) {}

        @Post('profile-image')
      @UseGuards(AccessTokenGuard)
      @UseInterceptors(FileInterceptor('file'))
      async addProfileImage(@Req() request: RequestWithUser, @UploadedFile() file: Express.Multer.File) {
        return this.usersService.addProfilePhoto(request.user._id, file.buffer, file.originalname);
  }
}
Setting up a delete file service
We need to delete the file from both our database and AWS s3. Go to the uploads service and write a **deleteFile**method which takes in a file ID.
import { ConfigService } from '@nestjs/config';
import { Model } from 'mongoose';
import { Upload, UploadDocument } from './upload.schema';
import { HttpException, Injectable, HttpStatus } from '@nestjs/common';
import { InjectModel } from '@nestjs/mongoose';
import { S3 } from 'aws-sdk';
import { v4 as uuid } from 'uuid';

@Injectable()
export class UploadsService {
    constructor(
        @InjectModel(Upload.name) private uploadModel: Model<UploadDocument>,
        private configService: ConfigService,
    ) {}

   async deleteFile(fileId: string) {
        const file = await this.uploadModel.findById(fileId);
        if (!file) {
            throw new HttpException('File not found', HttpStatus.NOT_FOUND);
        }
        const s3 = new S3();
        await s3
            .deleteObject({
                Bucket: this.configService.get('AWS_PUBLIC_BUCKET_NAME'),
                Key: file.key,
            })
            .promise();
        await this.uploadModel.findByIdAndDelete(fileId);
    }
}
Let’s add a deleteProfilePhoto to the user service.
import { HttpException, HttpStatus, Injectable } from '@nestjs/common';
import { InjectModel } from '@nestjs/mongoose';
import { User, UserDocument } from './schemas/user.schema';
import { Model } from 'mongoose';

import { UploadsService } from 'src/uploads/uploads.service';

@Injectable()
export class UsersService {
    constructor(@InjectModel(User.name) private userModel: Model<UserDocument>,  private uploadsService: UploadsService) {}

    async addProfilePhoto(
        userId: string,
        imageBuffer: Buffer,
        filename: string,
    ) {
        const photo = await this.uploadsService.uploadFile(
            imageBuffer,
            filename,
        );

        const updatedUser = await this.userModel.findByIdAndUpdate(userId, {
            photo: photo,
        });

        if (!updatedUser) {
            throw new HttpException(
                'The user with this id does not exist',
                HttpStatus.NOT_FOUND,
            );
        }
        return updatedUser;
    }

        async deleteProfilePhoto(userId: string) {
        const user = await this.userModel.findById(userId);
        if (!user) {
            throw new HttpException('User not found', HttpStatus.NOT_FOUND);
        }

        const fileId = String(user.photo._id);
        if (fileId) {
            await this.userModel.findByIdAndUpdate(userId, {
                photo: null,
            });
        }

        await this.uploadsService.deleteFile(fileId);
    }

}
Set up a custom controller to handle files
We can set up a custom controller or route in uploads.controller.ts that can handle a schema with just one image property or a schema that has an array of images as a property. For example, this can be useful in an eCommerce application that has a product schema with multiple product images. Instead of building two different routes for products and a user's profile image, we can just build one custom route that can handle either of the requests.
import {
    Controller,
    Post,
    UseInterceptors,
    UploadedFile,
    ForbiddenException,
} from '@nestjs/common';
import { ApiTags, ApiBody, ApiBearerAuth, ApiConsumes } from '@nestjs/swagger';
import { UploadsService } from './uploads.service';
import { AnyFilesInterceptor } from '@nestjs/platform-express';

@Controller('uploads')
@ApiBearerAuth()
@ApiTags('Uploads')
export class UploadsController {
    constructor(private readonly fileUploadService: UploadsService) {}
    @Post('image')
    @ApiBody({
        required: true,
        type: 'multipart/form-data',
        schema: {
            type: 'object',
            properties: {
                files: {
                    type: 'array',
                    items: {
                        type: 'string',
                        format: 'binary',
                    },
                },
            },
        },
    })
    @ApiConsumes('multipart/form-data')
    @UseInterceptors(AnyFilesInterceptor())
    async uploadFile(@UploadedFile('files') files) {
        if (!files[0])
            throw new ForbiddenException("You can't upload a blank field");
        const imageArr = [];
        for (const i in files) {
            const uploadedFile = await this.fileUploadService.uploadFile(
                files[i].buffer,
                files[i].originalname,
            );
            imageArr.push(uploadedFile.url);
        }
        return { error: false, data: imageArr };
    }
}
The uploadFile controller takes in an array of files and loops through them to access each of the files buffer or data chunks and file names and save them to the file upload schema.
Summary
In this article, we demonstrated how we can use AWS S3 to serve public files instead of saving them in the same database as our application which affects the performance of our application.
You can leave a comment if you face any issues implementing any part of this article.